Yu-Gi-Oh! Clone Dev Log #1: Rendering Cards
![]()
For the last two years, I have dedicated some of my free time to chipping away at the monumental task of writing a game framework in C with only a few dependencies. When I reached a certain point with my framework, Alchemy, I wanted to choose a project large enough that it would test its limits. This would also give me clear direction for future engine development. Because I enjoyed collecting the cards and playing with friends growing up, and because I had recently been watching the Yu-Gi-Oh! Duel Monsters show and playing Yu-Gi-Oh! The Dawn of Destiny (a childhood favorite Xbox game), I decided to make a Yu-Gi-Oh! project to test my engine.
At first, I was primarily interested in simply rendering a card, which is more challenging than it might sound. Modern Yu-Gi-Oh!, includes 15 different card types if you count tokens and split Pendulum Monsters into subtypes. However, this project is only concerned with the original 6 card types from the classic era, which had 4 types of Monster cards (Normal, Effect, Fusion, and Ritual), as well as Spell and Trap cards. Each type is different and contains many variable elements, such as a certain number of stars on a Monster card depending on the card’s level, different fonts, and justified text that needs to shrink to fit a certain area. This first dev log focuses on everything that goes into rendering a card.
TL;DR
- Implemented real-time rendering of Yu-Gi-Oh! cards with my custom C game engine, Alchemy, to test and develop engine features.
- Supported card layout for all six classic card types (Normal/Effect/Fusion/Ritual Monsters, Spells, and Traps).
- Developed a text rendering pipeline with vertical and horizontal alignment, as well as dynamic horizontal and vertical shrink-to-fit by performing binary search over font size.
- Compared real-time compositing with historical pre-rendering approaches.
- Next steps: card serialization, library viewer, and deck builder.
Contents
- Anatomy of a Card
- Rendering Approaches: Pre-Rendered vs. Real-Time
- Text Justification
- Initializing and Rendering Cards
- Why Make a Clone?
- What’s Next?
Anatomy of a Card
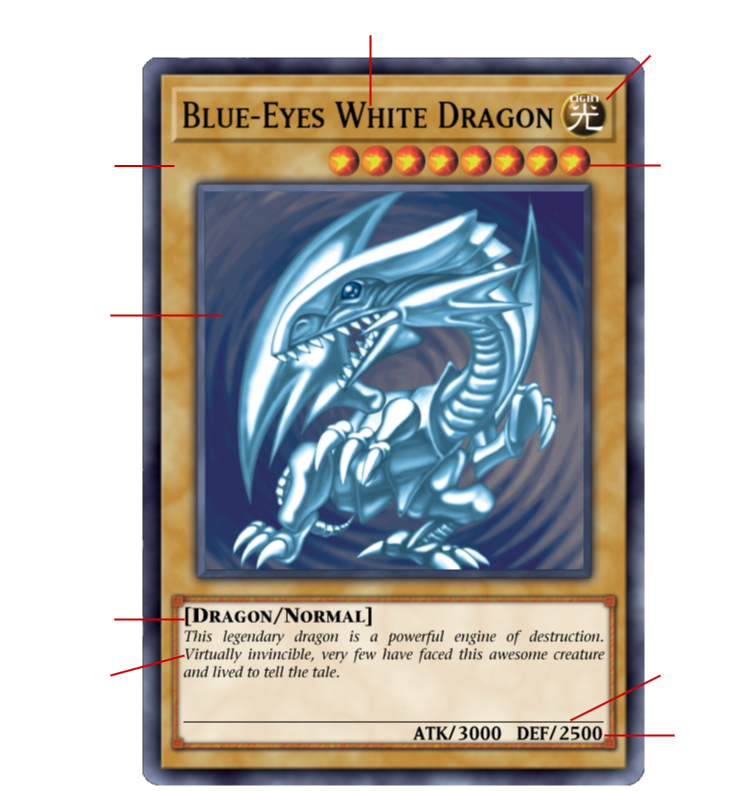
Although there are six different types of cards in classic Yu-Gi-Oh!, the main differences in rendering only come up between Monster cards and Spell/Trap cards. All cards have a title, attribute symbol, and lore/effect text. Monster cards also have a row of stars under the title box representing the card’s level. In the box under the card’s artwork, they have a list of Monster types, ATK and DEF stats, and a bar dividing the lore/effect text and stats.
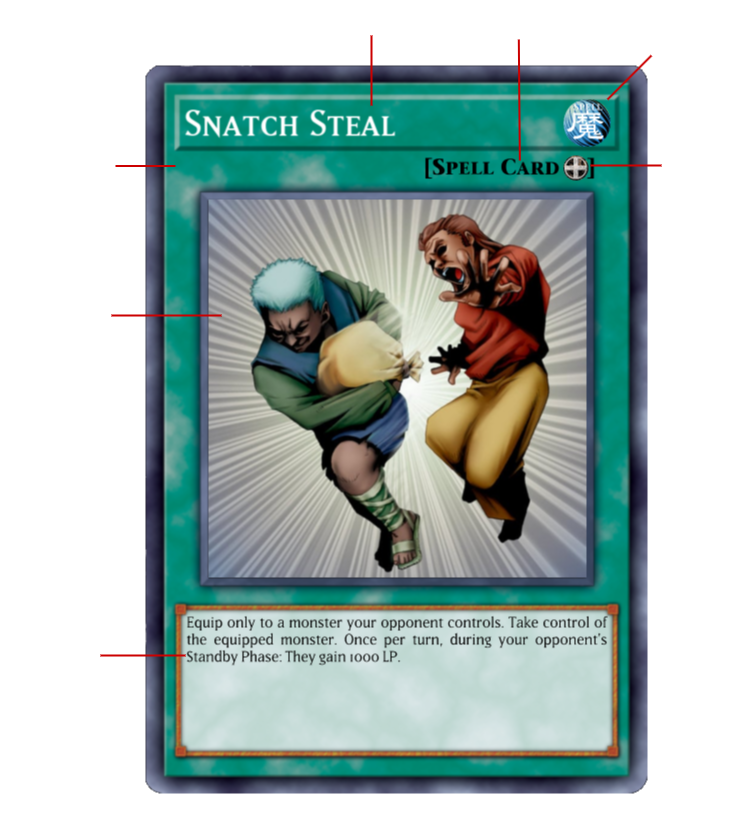
Spell/Trap cards move the bracketed type text to where a Monster’s level stars would be, the effect text is moved to the top of the box, and there is no text for stats. These cards can also have a property symbol within the bracketed type text. Another minor difference between these types of cards is that the title text is black for Monsters and white for Spells and traps. Because Normal Monsters do not have effects, they have lore text in italics to add flavor to the card. Cards with effects or requirements use a non-italic font. The diagrams below show the primary differences between Monster and Spell cards.
Below are examples of each card variation. The top row shows each type of Monster card, and the bottom row shows Spell and Trap cards with and without properties.
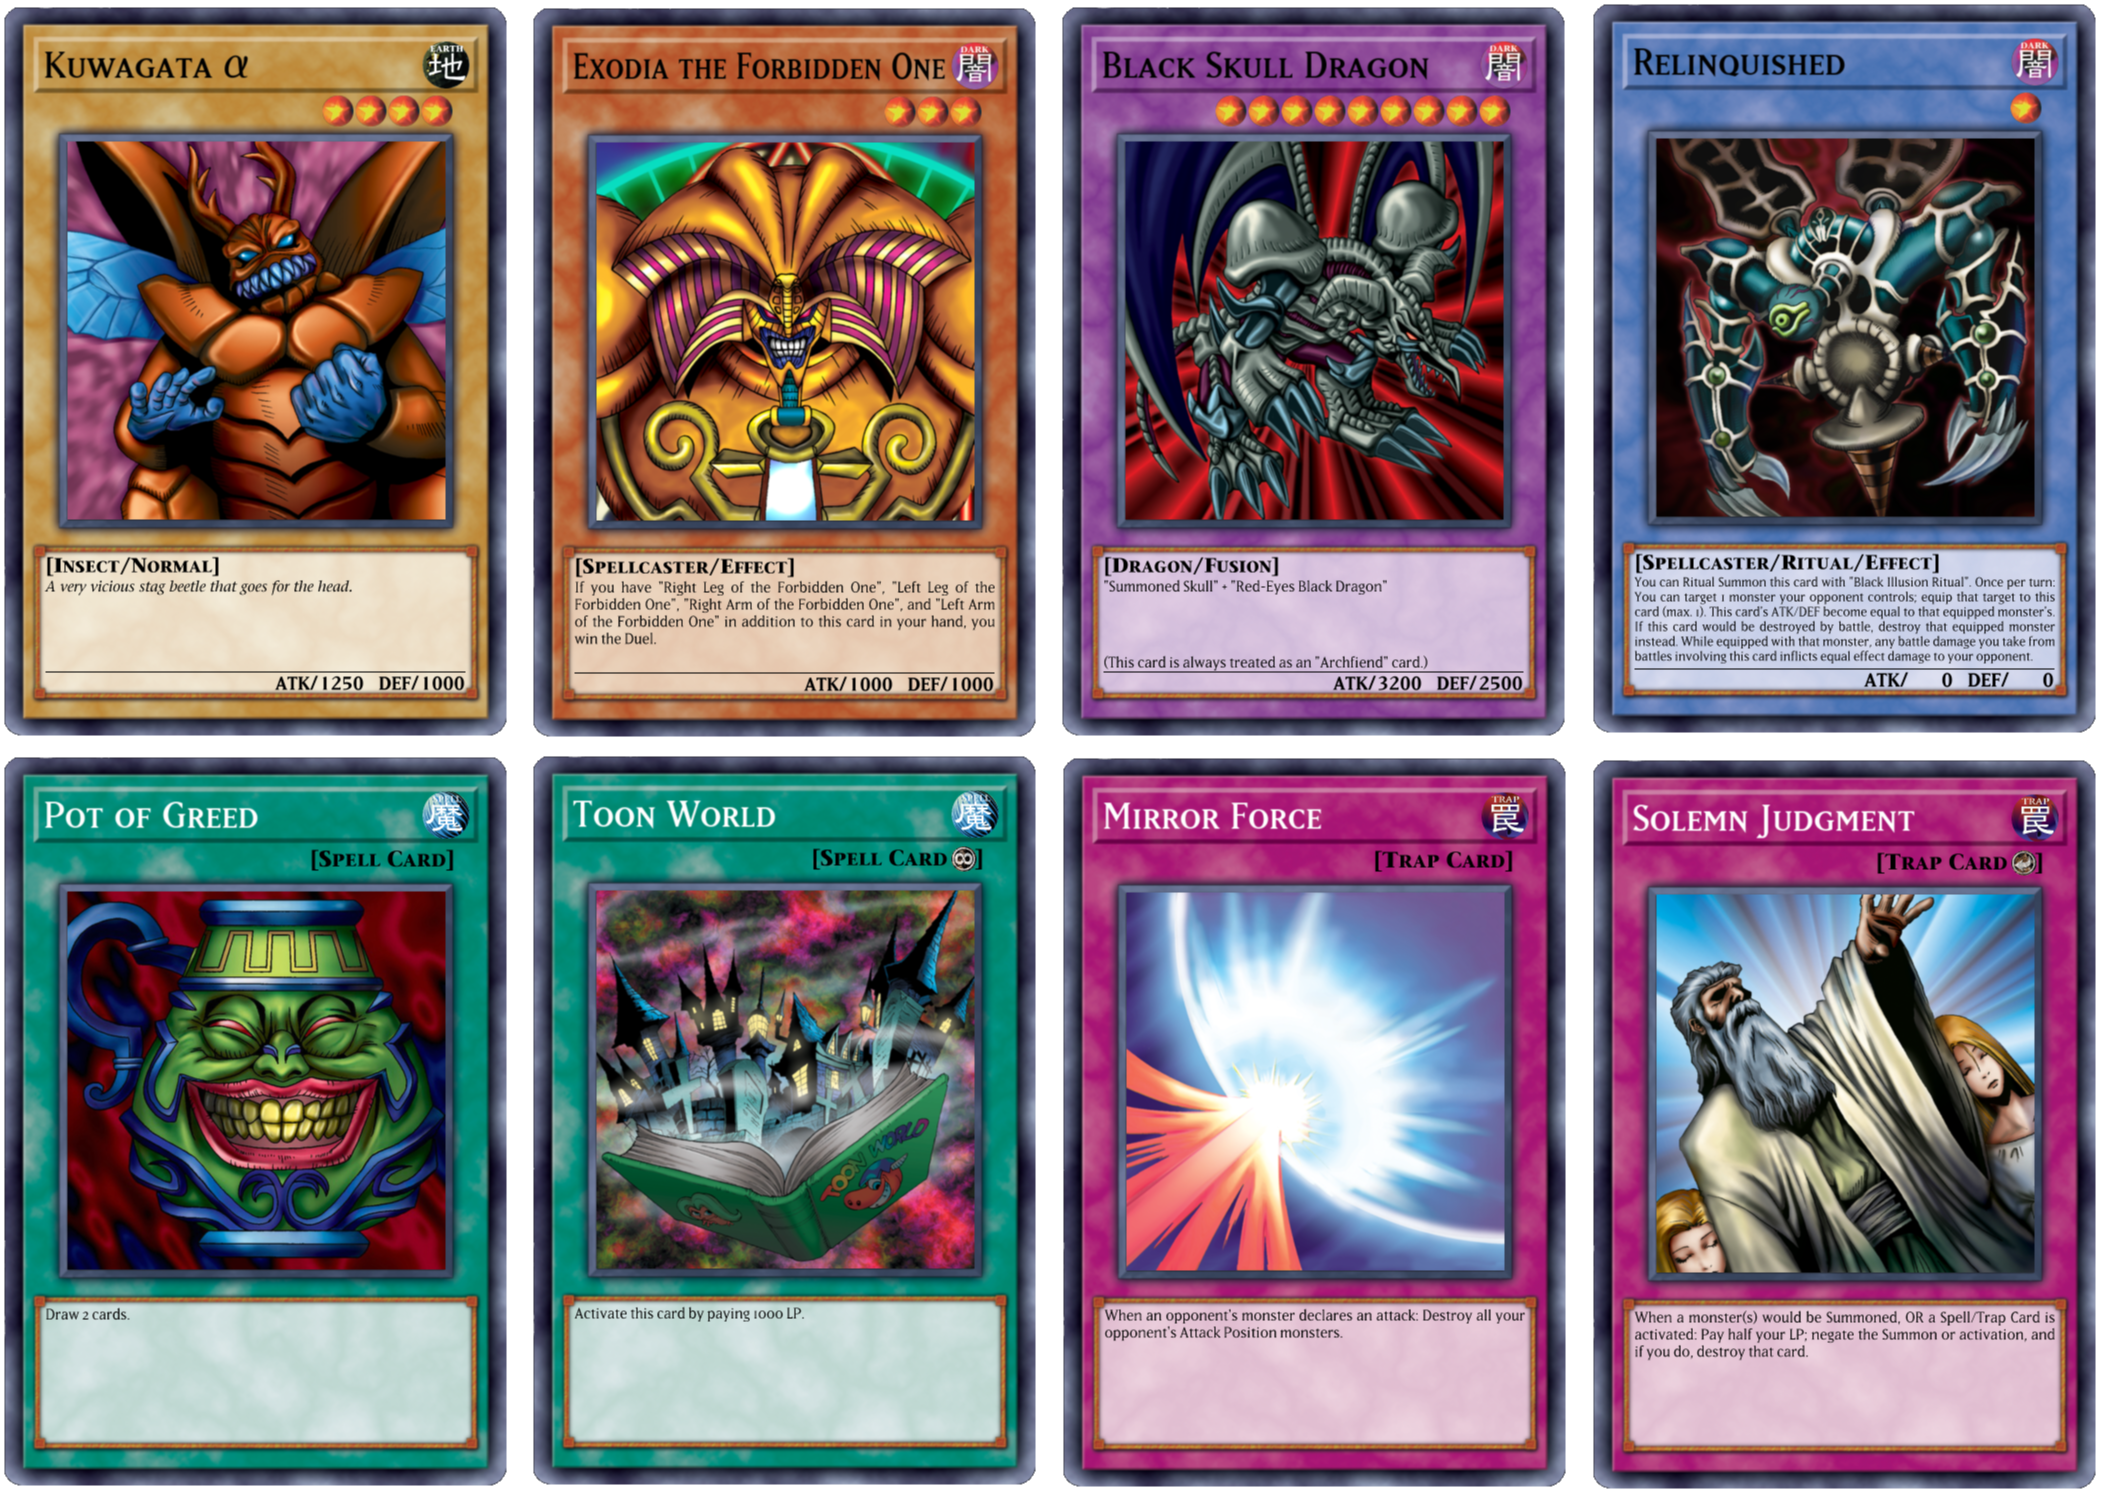
These examples also demonstrate a few more interesting properties of some cards. The Normal Monster Kuwagata α shows that some cards contain characters outside the ASCII range. Most commonly, these characters will either be Greek letters, as in this case, or bullet points for some cards that have multiple effects to choose from. Normal Monsters are also the only type to use an italic font.
Although it may be difficult to see in the image, the Fusion Monster Black Skull Dragon contains a disclaimer just above its stats that it is always treated as an Archfiend card. These disclaimers appear on only a few cards, so they require special handling.
The Ritual Monster Relinquished contains enough effect text that the font size needs to decrease to fit it all within bounds. Methods for justifying text and shrinking it to fit bounds will be discussed further down.
Finally, the row of Spell and Trap cards shows that they may or may not have a property displayed. Normal Spell and Trap cards do not display a property. When a Spell or Trap includes a property symbol, it has special activation conditions. This example shows Toon World, a Continuous Spell card, and Solemn Judgment, a Counter Trap card. Spells can be Normal, Continuous, Equip, Field, Quick-Play, or Ritual, and Traps can be Normal, Continuous, or Counter.
Rendering Approaches: Pre-Rendered vs. Real-Time
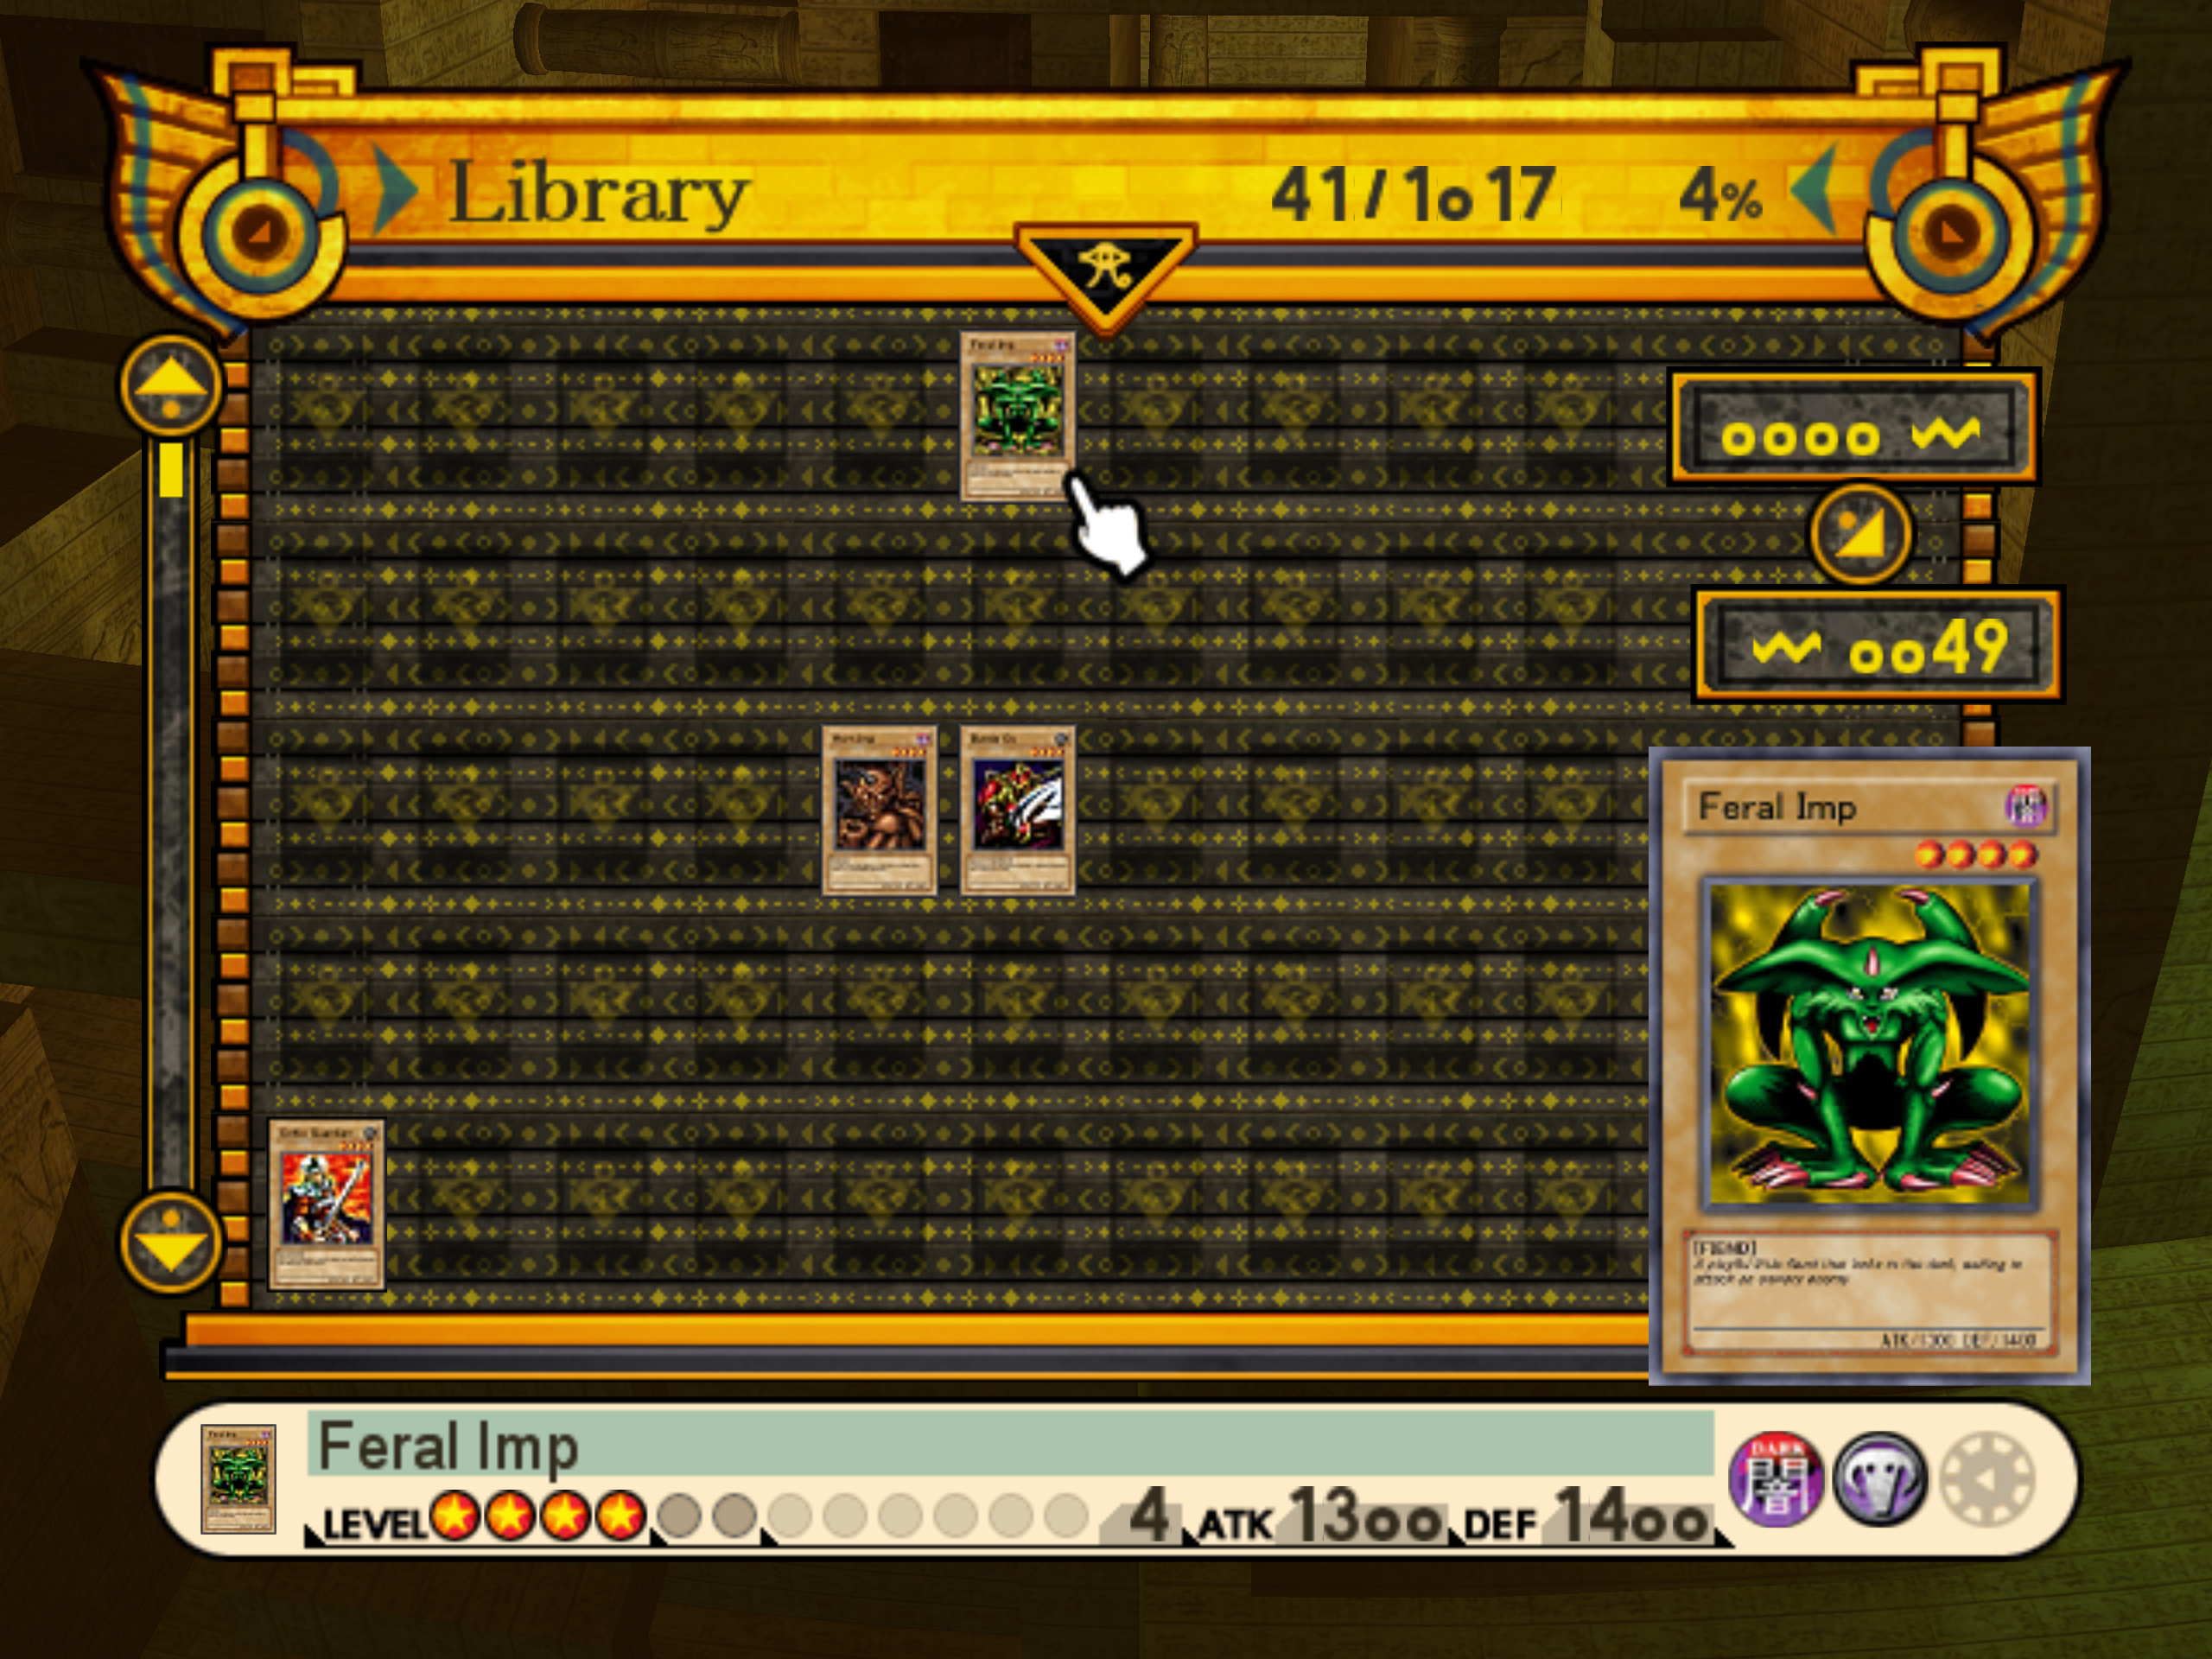
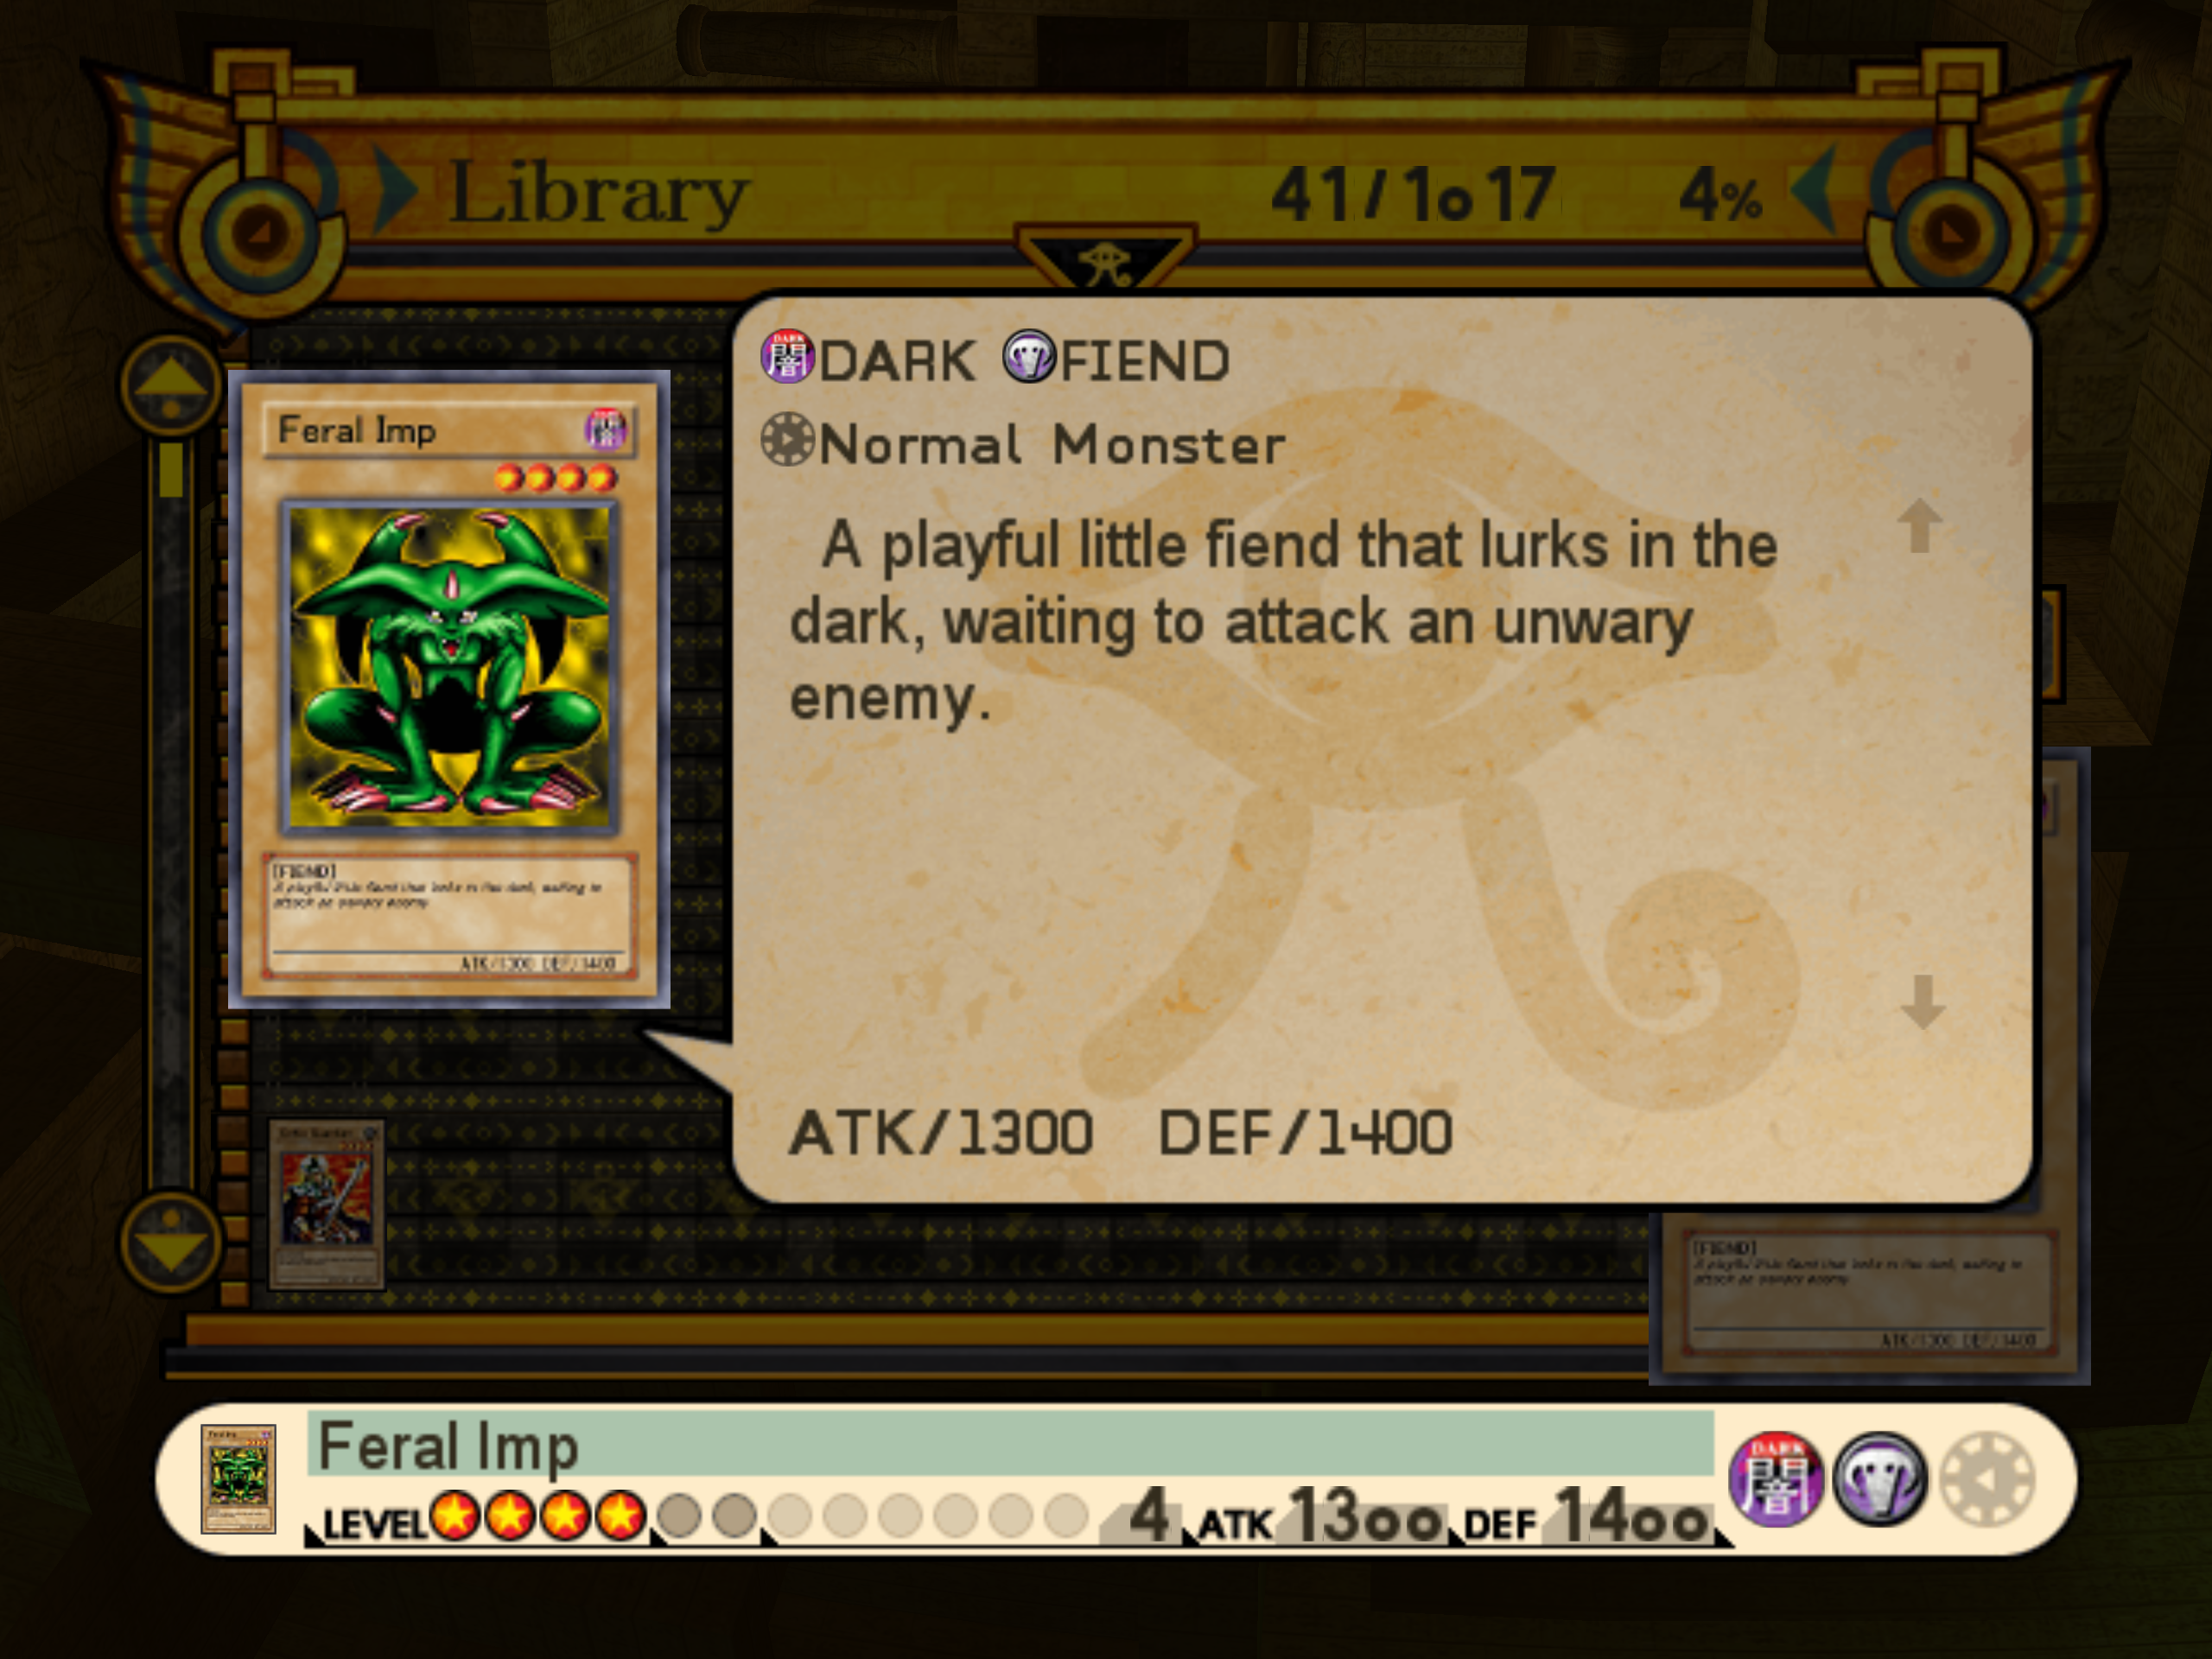
Many Yu-Gi-Oh! games made for old hardware likely pre-rendered each card into an image (or many cards into a texture atlas) rather than drawing them from individual components. This was necessary at the time due to strict memory and rendering limitations. However, issues become apparent with this approach when a card needs to be magnified or zoomed in on. The text, in particular, becomes blurry. In games like The Dawn of Destiny for the original Xbox, the text is more for decoration. It’s not legible on the card at any size. When inspecting a card, the game renders the text separately in a UI overlay. Below are some examples from this game.
Today, there are much stronger reasons to render all a card’s elements in real time rather than relying on pre-rendered assets. First, it allows for deeper customization options like choosing variant artworks for each card, or providing options for drawing cards as they appear in real life or the anime. Also, it opens the door to many more visual effects to be applied to cards. For instance, shaders can be applied to mimic real-life foil cards and holographic lettering. Rare cards make the card’s title text silver and reflective, and other rarities have a shimmering effect over the card artwork, title text, and other symbols. Modern PC hardware has no trouble compositing cards from multiple components, allowing both functionality and aesthetics.
Text Justification
Because they are just textures, it was a simple task to draw the card frame, artwork, and symbols on the card. Handling the text was, by far, the most difficult part. Different pieces of text have different requirements, but they can be summarized as:
- Shrink text horizontally or uniformly to fit bounds
- Horizontally justify text
- Right-align text
First, some card titles are quite long and would not fit inside the title box without shrinking in some way. Clearly, it would not look right to uniformly shrink the text, so it needs to be squished horizontally, which gives the appearance of a lower font weight. One early example is Winged Dragon, Guardian of the Fortress #1. Compared to earlier examples, the title text is thinner to accommodate the card’s long name.

Next, the lore/effect text of cards should be horizontally justified, and it must also shrink to fit the bounds of its container. Some specifics of text formatting will be discussed in a later Alchemy dev log, but I will give a brief overview here. First, the font size should decrease until the total area of the text (width and height) fits within the bounds. Then, the text must be broken up into lines. The width of each word and space is considered until it would overflow the current line. Next, the overflow is pushed to the next line, and the process continues until there is no more text. Finally, when the text is drawn, for each line, if there is any leftover horizontal space, it is evenly distributed among the spaces between words. The resulting text should be flush to the bounds on both the left and right.
Additionally, if the font size must decrease in order to fit the text within its bounds, it should be flush with the bottom bound of the text area, or as close as possible. And finally, when the text area is scaled up or down, the lines of the text should still break on the same words. It is common in many applications to see the line breaks move if you smoothly scale the window or text box. These requirements are only achievable with fractional font sizes. To accomplish this, my engine loads a font at an integer size larger than necessary (say, 64 pixels), so that text will only need to be scaled down. After requesting that size, a bitmap is generated for each glyph in the font, which the engine caches. Then, those bitmaps can simply be scaled to fractional sizes.
Preventing line breaks comes naturally since the text area and font size scale with each other at the same rate. However, if the text area could grow at fractional sizes, while the font size could only ever be an integer, this would not be the case. Keeping the bottom line of text flush with the bottom bound of the text area is more difficult. Again, I will discuss more of the specifics in a later Alchemy dev log, but here is the basic idea. First, the text height must be found. The text must be parsed to find the line breaks, so unfortunately, the ideal font size must be searched instead of simply calculated. The search can be performed as a binary search with a minimum font size of 0 and a maximum of the current font size. The search is concluded when the minimum and maximum font size are updated so that they differ by a given epsilon, an acceptable error.
Many Yu-Gi-Oh! cards, especially newer ones, have complex effects and a lot of text that needs to fit within the bounds. Relinquished is one example from the early card sets. It was pictured above, but it is also reproduced larger below to better see the effect text.
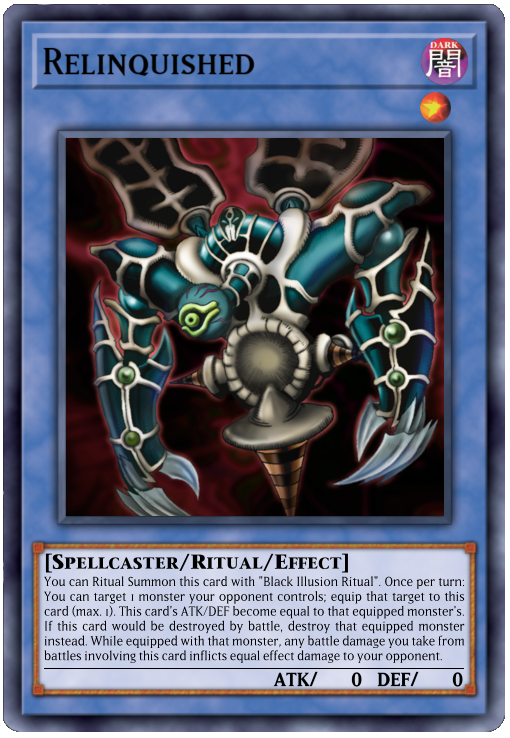
There is another interesting property that can be observed in the Relinquished card. Notice that this Ritual Monster has 0 ATK and DEF, and the 0 value is separated from the strings “ATK/” and “DEF/”. Indeed, the numerical values are treated separately and are right-aligned. Text alignment is much simpler than justification. When right-aligning text, it is as simple as determining the leftover horizontal space between the end of the string and the bounds and adding that space to the string’s position.
Initializing and Rendering Cards
Now that we’ve covered the various requirements for rendering cards, let’s take a brief look at some initialization and rendering code. First, much of the data and resources for cards are common among them, such as the various fonts used on each card and the textures for attributes, properties, frames, and the level star. These resources are held in a struct called CardResources:
typedef struct
{
    CardFonts fonts;
    CardFrames frames;
    AttributeTextures attribute_textures;
    PropertyTextures property_textures;
    Texture level_tex;
} CardResources;
For easier organization, this structure is broken up into several smaller ones. Each of these smaller structures simply hold a resource for each possible value.
typedef struct
{
    Font title_font;
    Font type_font;
    Font lore_font;
    Font effect_font;
    Font stats_font;
} CardFonts;

typedef struct
{
    Texture normal_monster;
    Texture effect_monster;
    Texture fusion_monster;
    Texture ritual_monster;
    Texture spell;
    Texture trap;
} CardFrames;

typedef struct
{
    Texture dark;
    Texture divine;
    Texture earth;
    Texture fire;
    Texture light;
    Texture water;
    Texture wind;
    Texture spell;
    Texture trap;
} AttributeTextures;

typedef struct
{
    Texture normal;
    Texture continuous;
    Texture counter;
    Texture equip;
    Texture field;
    Texture ritual;
    Texture quick_play;
} PropertyTextures;
A Brief Tangent on Enumerations
As we will see a bit later, the appropriate resources from each of these structures are selected with a switch statement based on related enumerations. For example, here is the enum for selecting the appropriate card property for Spell or Trap Cards:
typedef enum
{
    CardProperty_Normal = 0,
    CardProperty_Continuous,
    CardProperty_Counter,
    CardProperty_Equip,
    CardProperty_Field,
    CardProperty_Ritual,
    CardProperty_QuickPlay,

    CardProperty_Num
} CardProperty;
When I use an enum, I always try to pick a sensible default value to set to zero since I default to zero-as-initialization. In this case, it makes sense to default property to “Normal” because most Spell and Trap Cards are Normal. It is the rarer case that they have any other property. In other cases, it might make sense to default to a “none” value if it is ever the case that a variable would have none of the types. Looking again at card properties, any Spell or Trap that does not specify a property is automatically Normal, and this value does not affect Monster Cards, so a “none” type doesn’t make sense here. However, it doesn’t make as much sense for Spells and Traps to have a monster type set, and if they did, it would require an extra check. Whenever a mechanic needs to check the monster type, it would also have to check if the card was not a Spell or Trap. If there is a “none” type, this extra check is unnecessary. Below is an abridged version of that enum:
typedef enum MonsterType
{
    MonsterType_None = 0,

    MonsterType_Aqua,
    MonsterType_Beast,
    // ...
    MonsterType_Zombie,

    MonsterType_Num
} MonsterType;
There are a few more things to note about how these enumerations are organized, and they are all related to UI organization. The first is that I almost always include a _Num value as the last value in an enum. Typically, the only exception is when an enum is used for flags, where each value is a successive power of two. Other than that, as its name implies, it simply gives the number of fields in the enum, which is useful when its values need to be looped over. The other thing to note is that the values appear in alphabetical order. All of these properties come in handy when programming UI behavior. For example, consider the case where I want to be able to filter a list of cards by any of the Monster Types. Instead of manually placing a button for each value, I can instead just make a function to convert the ability to a string and loop over them, being careful to start iterating at one to skip the “none” value. Then, I can write something like this:
for (u32 type = 1; type < MonsterTypes_Num; ++type)
{
    if (ui_button(monster_type_to_str(type)))
        set_filter(type);
}
Back to Initializing
Next, the bounds for each area of the card need to be specified. This information is stored in a struct and accounts for each possible variation, such as the different bounds for type text in Monster cards vs. Spells and Traps.
typedef struct
{
rect template_frame;
rect art_frame;
rect level_frame;
rect attribute_frame;
rect property_frame;
rect title_frame;
rect type_frame_monster;
rect type_frame_spell;
rect lore_frame_monster;
rect lore_frame_spell;
rect disclaimer_frame;
rect atk_frame;
rect atk_value_frame;
rect def_frame;
rect def_value_frame;
rect stats_bar_frame;
} CardLayout;
CardLayout card_layout_init(void)
{
// Card size is 401x581
// Offsets relative to top left corner of normal size card template
CardLayout layout = {0};
layout.template_frame = rect(0.0f, 0.0f, 401.0f, 581.0f);
layout.art_frame = rect(51.0f, 108.0f, 301.0f, 301.0f);
layout.level_frame = rect(333.0f, 71.0f, 25.0f, 25.0f);
layout.attribute_frame = rect(334.0f, 28.0f, 38.0f, 38.0f);
layout.property_frame = rect(334.0f, 76.0f, 20.0f, 20.0f);
layout.title_frame = rect(32.0f, 28.0f, 300.0f, 38.0f);
layout.type_frame_monster = rect(34.0f, 439.0f, 335.0f, 20.0f);
layout.type_frame_spell = rect(210.0f, 76.0f, 150.0f, 20.0f);
layout.lore_frame_monster = rect(34.0f, 454.0f, 335.0f, 75.0f);
layout.lore_frame_spell = rect(34.0f, 437.0f, 335.0f, 108.0f);
layout.disclaimer_frame = rect(34.0f, 515.0f, 335.0f, 20.0f);
layout.atk_frame = rect(214.0f, 532.0f, 35.0f, 12.0f);
layout.atk_value_frame = rect(247.0f, 532.0f, 38.0f, 12.0f);
layout.def_frame = rect(296.0f, 532.0f, 35.0f, 12.0f);
layout.def_value_frame = rect(328.0f, 532.0f, 38.0f, 12.0f);
layout.stats_bar_frame = rect(34.0f, 530.0f, 335.0f, 1.0f);
return layout;
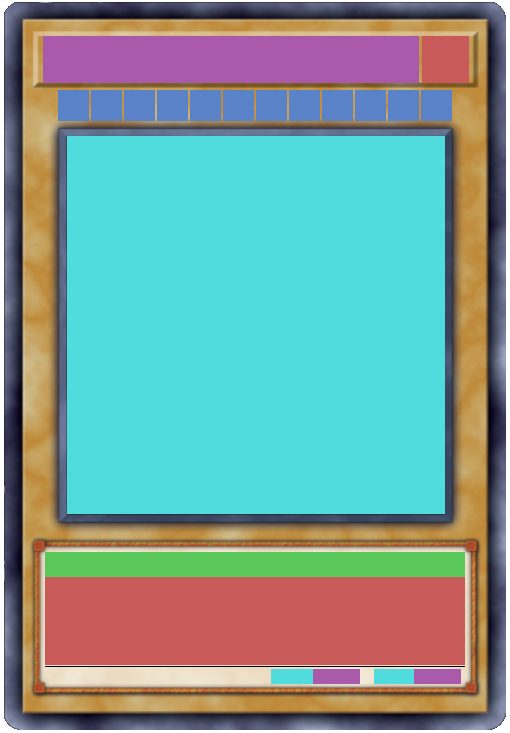
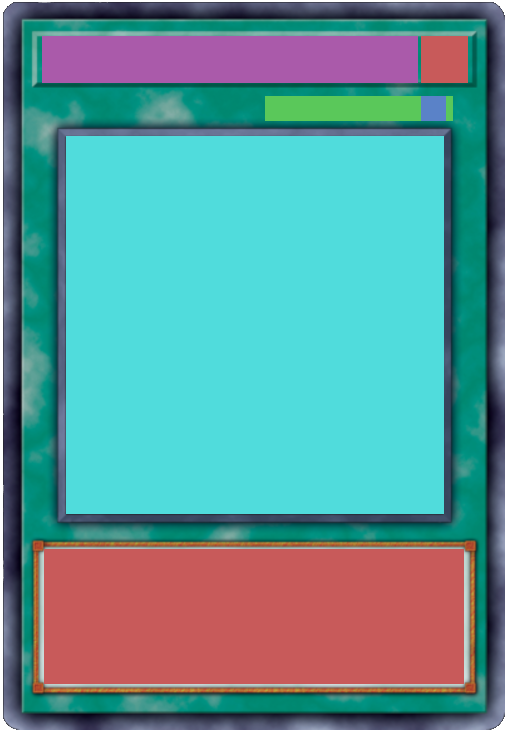
}Rendering colored quads over each of these bounds provides a good visualization. Additionally, rendering these bounds behind each element gives a nice sanity check for rendering, which is especially useful for ensuring that text positioning and alignment works properly. For example, the tallest characters of the first line should be flush with the top bound of the text area, and the leftmost and rightmost characters should be flush with their bounds for justified text. Here are examples of a Normal Monster and a Spell Card to show the bounds. Note that the Monster Card example shows the bounds for each of its 12 possible level stars, not just the first one.
What’s in a Card?
Now, we finally arrive at the heart of the code, the Card structure. So what’s in a card? Well, lots of stuff (with more to add in the future):
typedef struct
{
    u32 id;
    v2 position;

    u8 level;
    u32 atk;
    u32 def;

    CardFrame frame;
    CardAttribute attribute;
    CardProperty property;
    MonsterType monster_type;
    MonsterAbility monster_ability;

    rect stats_bar;

    Sprite frame_sprite;
    Sprite art;
    Sprite level_star;
    Sprite attribute_sprite;
    Sprite property_sprite;

    TextArea title;
    TextArea type_text;
    TextArea lore;
    TextArea disclaimer;
    TextArea atk_text;
    TextArea atk_value_text;
    TextArea def_text;
    TextArea def_value_text;

    u8 art_idx;
    u8 num_card_arts;
    Texture* card_arts;
} Card;
Some elements here should look familiar, but let’s touch on the ones we haven’t seen yet. First, as a quick note, I like to use a shorthand for many basic types, such as u32 instead of uint32_t or f32 instead of float. v2 is a 2-element vector (2 f32s). A TextArea is the bounded area of formatted text which was discussed earlier in this log. Again, it is complex enough for its own post and will be discussed in much greater detail there. Finally, a Sprite contains a pointer to a Texture plus a tint color, position, size, and rotation. A Texture contains an ID and image data (dimensions, number of channels, and pixel data).
Now, let’s walk through the elements of a card. Each card contains an ID, which will become very important and useful later. However, it is unremarkable just for rendering a card. Monster cards generally have a level or rank of 1 to 12, although at the time of writing, there have been two rank 13 monsters printed. Monster cards also have an ATK and DEF value. Although some cards can gain very high ATK values through effects, even up to 100,000, the values printed on the cards typically do not exceed 4 digits.
We have already discussed the various enum values used for cards, so we’ll skip those here. The stats_bar denotes the bounds of the black bar that divides a monster’s lore/effect text from its stats. It is simpler to store a copy of it here than to store a pointer to the CardLayout structure because it is the only set of bounds that needs to be accessed directly by the card.
All the images necessary to render a card are stored as sprites. Because these only store pointers to textures, the image data is not duplicated. The textual elements of the card are stored in text areas. Each of these can use different fonts and formatting, which we will see a bit later. Notice that it takes four text areas to cover the ATK and DEF text. Recall the earlier discussion about the format of this text. atk_text and def_text refer to the literal strings “ATK/” and “DEF/”, while atk_value_text and def_value_text refer to the numeric values. Because the literal strings must remain stationary while the numbers must be right-aligned, it takes four text areas to achieve this.
Finally, a card may have multiple artwork variations. Many cards only have one, but popular cards like Blue-Eyes White Dragon could have ten or more. To accommodate this, the card keeps track of an array of card artwork textures, the number of artwork variants in that array, and an index into that array for the currently selected artwork. This makes serializing artwork preferences as easy as storing a list of numbers and swapping the artwork as easy as changing the index:
card.art.texture = card.card_arts + card.art_idx;Rendering a Card
The next dev log will discuss serializing and loading card data, but for now, we can wrap up with the straightforward task of actually drawing the card to the screen. At least, it is straightforward with Alchemy’s renderer.
void draw_card(Renderer* renderer, Card card)
{
    draw_sprite(renderer, card.frame_sprite);
    draw_sprite(renderer, card.art);
    draw_sprite(renderer, card.attribute_sprite);

    draw_text_area(renderer, &card.title);
    draw_text_area(renderer, &card.lore);
    draw_text_area(renderer, &card.type_text);

    if (card.card_type != CardType_Spell && card.card_type != CardType_Trap)
    {
        if (card.disclaimer.text.string.data)
            draw_text_area(renderer, &card.disclaimer);

        draw_rect(renderer, card.stats_bar, color_black(), 0.0f);

        draw_text_area(renderer, &card.atk_text);
        draw_text_area(renderer, &card.atk_value_text);
        draw_text_area(renderer, &card.def_text);
        draw_text_area(renderer, &card.def_value_text);

        Sprite level_star = card.level_star;
        for (int i = 0; i < card.level; ++i)
        {
            draw_sprite(renderer, level_star);
            f32 separation = level_star.size.x*1.05f;
            level_star.position.x -= separation;
        }
    }
    else
    {
        if (card.card_property != CardProperty_Normal)
            draw_sprite(renderer, card.property_sprite);
    }
}
First, all cards must draw their frame, art, attribute, title, lore/effect text, and type text. Then, if the card is a monster (i.e., not a Spell or Trap), it may draw disclaimer text if it has any, the dividing bar between its lore/effect text and its stats, its stat text, and a level star for each of its levels. Otherwise, if the card is a Spell or Trap and has a property, it draws its property symbol.
That’s all there is to card rendering at the moment. Of course, any transformations to the card such as rotations would need to be applied to each of the child elements. Plus, many effects such as foil shaders could be applied to the card. However, this is enough for our purposes now.
Why Make a Clone?
A reasonable question you might have is “Why make a clone of an existing IP instead of making something new?” Simply put, I was just excited about it, and I knew that it would keep me on the right track in my engine development. It allows me to develop several new techniques in rendering, shading, and asset management. I can implement bots to play against, and I can even include networked multiplayer. It provides a fun experience to share with friends that also enjoy Yu-Gi-Oh!, and we can make the experience exactly how we want.
Moreover, I’ve noticed small differences in how many Yu-Gi-Oh! games draw their cards that I wanted to improve on. For instance, Yu-Gi-Oh! The Dawn of Destiny uses a normal sans-serif font for title text, rather than the Matrix Small Caps font used on real-life cards. Other card text uses a similar or the same font, but since this text is mostly illegible, it does not stick out as much. This can be seen from the screenshots in an earlier section. Even the more recent Yu-Gi-Oh! Master Duel leaves lore/effect text unjustified, which gives the cards a slightly different look from the physical originals.
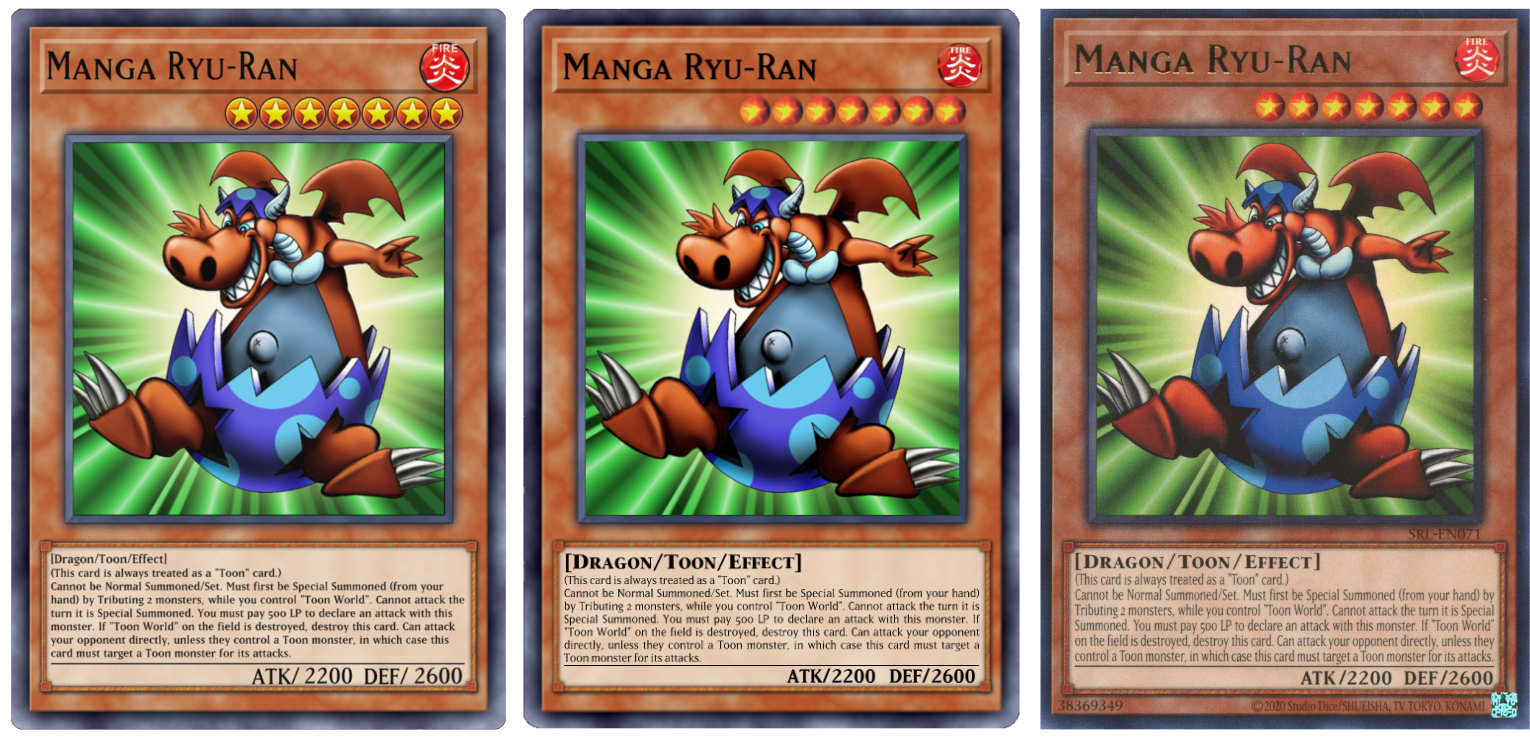
For a concrete example, compare the below images. The leftmost image is the card Manga Ryu-Ran from Yu-Gi-Oh! Master Duel. The middle image is one of my renders. The rightmost image is the real-life card from a recent 25th Anniversary reprint (image from Yugipedia). My goal was to achieve similar typography to the physical cards. In the comparison below, my render (center) aligns more closely with the real-life card than the Master Duel version, though the line breaks differ.
What’s Next?
At this point, I was able to draw any card from classic Yu-Gi-Oh!, so the logical next step was to add and serialize a lot more cards. That would pave the way to making a library viewer, deck builder, and other features. The next few entries in this series will deal with how I store and load card data. They will touch on considerations such as ease of editing, speed of loading, and the careful ordering of cards in the database.
Have a comment on this article? Contact me to start a discussion.